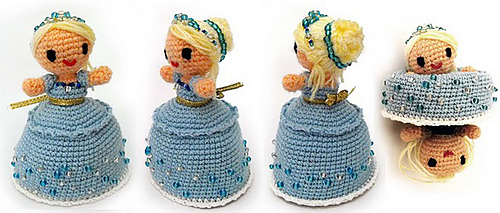
This pattern is my tweaking of the previous Cinderella Doll pattern, therefore much of the credit goes to that creator. But I did put in a good deal of time and trial and error to create this unique doll, especially on the Anna side.

Materials:
Yarn in Light Blue, Dark Blue, Skin, Black,
Yellow, Dark Pink, White, Brown
Embroidery Thread Brown, Red, Green, Pink
Eyes
Crochet hook D: 3.25mm
Needle for wool sewing.
Stitch marker
The doll is crocheted from the head of Anna
through her body, switches to Elsa’s Body and finished with her head. The skirt
is crocheted onto their bodies. I used continuous circles when crocheting them.
Start with Anna side:
 1) With skin color yarn: Magic Ring with 6
st. (6)
1) With skin color yarn: Magic Ring with 6
st. (6)
2) 2sc in each sc around (12)
3) *2sc in first sc, 1sc in next sc* repeat
from * to* (18)
4) *2sc in first sc, 1sc in next 2 sc* repeat
from * to* (24)
5) *2sc in first sc, 1sc in next 3 sc* repeat
from * to* (30)
6) *2sc in first sc, 1sc in next 4 sc* repeat
from * to* (36)
7 to 10) 1sc in each sc around (36)
11) *scdec, 1sc in next 4 sc*, repeat from *
to* (30)
12) *scdec, 1sc in next 3 sc* repeat from *
to* (24)
I have found it easier to wait until the Anna half is done before attaching the eyes so that I can make sure they line up with the design of her shirt.
13) *scdec, 1sc in next 2 sc* repeat from *
to* (18)
14) *scdec, 1sc in next sc* repeat from * to*
(12)
-
Finish stuffing
the head.
Now we will be
jumping between light blue (LB), skin color (S), black (BK) and yellow (Y) to
create the shirt portion of Anna’s dress.
15) (LB) *2sc in first sc, 1sc in next sc* (2x), 2sc in next sc,
(S) 1sc in next sc, 1sc in next sc, (LB) 1sc in same sc,1 sc in next sc, *2sc
in next sc, 1sc in next sc * (2x) (18)
16) (BK) 2sc in first sc, 1sc in next 5 sc,
(Y) 1sc in next sc, (LB) 1sc in
same sc, 1sc in next 4 sc, (Y)
1sc in next sc, (BK) 2sc in
next sc, 1sc in next 5 sc (21)
17) (BK continued) 1sc in next 8 sc, (Y) 1sc in next sc, (LB) 1sc in next 3 sc, (Y) 1sc in next sc, (BK) 1sc in next 8 sc (21)
18) (BK continued) 2sc in first sc, 1sc in
next 6 sc, 2sc in next sc, 1sc in
next 2 sc, (Y) 1sc in next 2 sc, (BK) 1sc in next 2 sc, 2sc in next sc, 1sc in
next 6 sc (24)
-Continue
next few rows in black
19) 1sc in each sc around (24)
20) 1sc in each sc around; back loop only
(24)
-Attach Anna's eyes and embroider the eyebrows and mouth.
-Attach Anna's eyes and embroider the eyebrows and mouth.
-Switch
to Light Blue yarn
21) In (LB) yarn (we are beginning Elsa): 1sc
in each sc around; back loop only (24)
22) 1sc in each sc around (24)
23) *scdec, 1sc in next 6 sc*, repeat from *
to* (21)
24) 1sc in each sc around (21)
25) *scdec, 1sc in next 5 sc*, repeat from *
to* (18)
- Stuff body
- Switch to skin color
26) (S) *scdec, 1sc in next sc* repeat from *
to* (12).
27) *2sc in first sc, 1sc in next sc* repeat
from * to* (18)
28) *2sc in first sc, 1sc in next 2 sc*
repeat from * to* (24)
29) *2sc in first sc, 1sc in next 3 sc*
repeat from * to* (30)
30) *2sc in first sc, 1sc in next 4 sc*
repeat from * to*(36)
31 to 34) 1sc in each sc around (36)
35) *scdec, 1sc in next 4 sc*, repeat from *
to* (30)
36) *scdec, 1sc in next 3 sc* repeat from *
to*(24)
-
Attach eyes and
start to stuff the head
-
Embroider
eyebrows and mouth
37) *scdec, 1sc in next 2 sc* repeat from *
to* (18)
38) *scdec, 1sc in
next sc* repeat from * to* (12)
- Finish stuffing the head.
39) scdec in each sc all around, fasten off
all last 6sc together.
Arms: (make 4, 2 in Light Blue yarn, 2 in Blue + Yellow)
1) Skin Yarn: Magic Ring with 6 sts. (6)
2) *2sc in first sc, 1sc in next sc* repeat
from * to* (9)
3) *scdec, 1sc in next sc* repeat from * to*
(6)
4) 1sc in each sc around (6)
Elsa- still Skin color Anna-
change to Light Blue
5) 1sc in each sc around (6)
Elsa- Change to Light Blue Anna-
continue Light Blue
6) *2sc in first sc, 1sc in next sc* repeat from
* to* (9)
Elsa- continue Light Blue Anna-
Change to Yellow
7) *scdec, 1sc in next sc* repeat from * to*
(6) Fasten off. Leave yarn enough to sew the arms to the body.
-
Sew Arms on to
respective sides
Skirt: (make 2, one sky Light Blue and another Dark Blue with Black point
and Yellow Outline)
Anna
 1) Pick up 24 sts in the row 20 of the body,
catching the front loops that were left free. (Y) 1sc in next 12 sc, (BK) 1sc
in next 6 sc, (Y) 1sc in next 5 sc (24).
1) Pick up 24 sts in the row 20 of the body,
catching the front loops that were left free. (Y) 1sc in next 12 sc, (BK) 1sc
in next 6 sc, (Y) 1sc in next 5 sc (24).
You can pick and part to start, but if you
catch them starting at the very beginning of row 20, they’ll line up. If not
you’ll have to adjust.
2) (DB) *2sc in first sc, 1sc
in next 3 sc* (3X) 2sc in next sc, (Y) 1sc in next sc, (B) 1sc in next 4sc, (Y) 1sc in next sc, (DB) 2sc in next sc, 1sc in next sc, 2sc
in next sc, 1sc in next 2 (30)
3) (Continue DB) *2sc in first sc, 1sc in
next 5 sc* (2X) 2sc in next sc, 1sc in next 4 sc, 2sc in next sc, (Y) 1sc in
next sc, (BK) 2sc in next sc, (Y) 1sc in next sc, (DB) 2sc in next sc, 1sc in
next 7 sc (35)
4) (Continue DB) *2sc in first sc, 1sc in
next 6 sc* (3X), 2sc in next sc, 1sc in next sc, (Y) 2sc in next sc, (DB) 1sc
in next 3 sc, 2sc in next sc, 1sc in next 6 sc (40)
From this point on both skirts are the same
just in different colors
5) *2sc in first sc, 1sc in next 7 sc* repeat
from * to* (45)
6) *2sc in first sc, 1sc in next 8 sc* repeat
from * to*(50)
7) *2sc in first sc, 1sc in next 9 sc* repeat
from * to* (55)
8) *2sc in first sc, 1sc in next 10 sc*
repeat from * to*
(60)
9 a 22) 1sc in each sc around (60)
Fasten off.
With Light Blue Yarn pick up the 24 sc in the
same way, but in the row 21, in the black portion. Continue in the same way as
the previous skirt after row 4.

2) *2sc in first sc, 1sc in next 3 sc* repeat
from * to* (30)
3) *2sc in first sc, 1sc in next 5 sc* repeat
from * to* (35)
4) *2sc in first sc, 1sc in next 6 sc* repeat
from * to* (40)
When you have ready both skirts, you'll have
to join both with light blue yarn, sc through both skirts, to hold them
together
Anna
With Brown Yarn
Cut lots of strands twice the length of the doll
Lay flat across her head
Sew/Secure each strand down the middle of her head
Sew/Secure each strand again halfway down the side of Anna’s
head
Braid two side braids
Tie together with a strand of her hair
Trim the extra lengths of ‘hair’
Elsa
With White Yarn
Cut lots of strands twice the length of the doll
Fold in half and line up along front of head
Secure/Sew each ‘loop’ along the front of her head
Sew/Secure them again halfway down the back of her head
Braid one long braid
Tie together with a strand of her hair
Trim the extra lengths of ‘hair’
Anna’s Cape
I hope this pattern is understandable. I created Anna's cape completely on my own in the best way I knew how, but there may be better ways to accomplish the same result.
In this part of the pattern there are parts a, b, and c of the first few rows. a is the first half-circle(ish) part, b is the middle part that extends down to be the cape part and c is the second half circles. The half-circles come around the front of Anna's neck to while the rest of the cape will extend down her back.
 Chain 31
1a) sc in 2nd ch from hook, 1 sc in next 6 sc,
turn (7)
2a) ch 1, scdec, 1 sc next 3 sc, scdec, turn (5)
3a) ch 1, scdec, 1 sc in next sc, scdec, turn (3)
4a) ch 1, 1 sc in next sc, sk 1, 1 sc in next sc (2)
sl st down to foundation ch
1b) sl st in next 2 sc, 1 sc next 12 sc, sl st in next 2 sc
1c) 1 sc next 7 sc, turn (7)
2c) ch 1, scdec, 1 sc next 3 sc, scdec, turn (5)
3c) ch 1, scdec, 1 sc in next sc, scdec, turn (3)
4c) ch 1, 1 sc in next sc, sk 1, 1 sc in next sc (2)
sl st down to foundation ch
2b) sl st in 2 sl stitches, 1 sc next 12 sc, turn
3b-4b) ch 1, 1 sc in each sc (12)
5) 2sc in first sc,
1 sc next 10 sc, 2sc in next sc(14)
6) 1 sc in each sc
7) 2sc in first sc,
1 sc next 12 sc, 2sc in next sc(16)
8) 1 sc in each sc
9) 2sc in first sc,
1 sc next 14 sc, 2sc in next sc
(18)
10) 1 sc in each sc
11) 2sc in first sc,1 sc next 16 sc, 2sc in next sc (20)
12-17) 1 sc in each sc
18) sc dec, 1 sc next 16 sc, sc dec (18)
19) 1 sc in each sc
20) sc dec, 1 sc next 14 sc, sc dec (16)
I am planning on creating a cape
for Elsa as well, but right now I’m not sure how I want to proceed. But maybe
that will come later.
12/10/14 - After making this doll a few more times I found some directions that needed editing. Old directions are crossed out and the new ones or changed ones have their round number highlighted.